Easy, DIY Jewelry Organizer
Can you believe July is half way over already? Where oh where does the time go? I’ve been keeping busy by tackling all the little organizing projects that sort of got pushed aside throughout the school year. And I’m FINALLY tackling our master closet. I’ve been wanting to get in there for a while, and I have lists of plans for the space, but in typical, no-one-ever-sees-this-so-it-can-wait, fashion somehow something else always took priority. Then, the other day I was feeling crafty and for whatever reason I decided I wanted to make a jewelry organizer.
My camera was having some issues that day, and I didn’t see the issue until I got all the pictures uploaded to the computer, so I apologize now for the somewhat blurry pictures.
This was one of those projects that went together so fast and so easy that I was left wondering why I waited so long to do it. I used only items I had around the house, even raided Liam’s craft cupboard for the tubes. Quick, easy, and now the creative juices are flowing for some other closet organizing project ideas, but I digress. Here’s how I put it together.
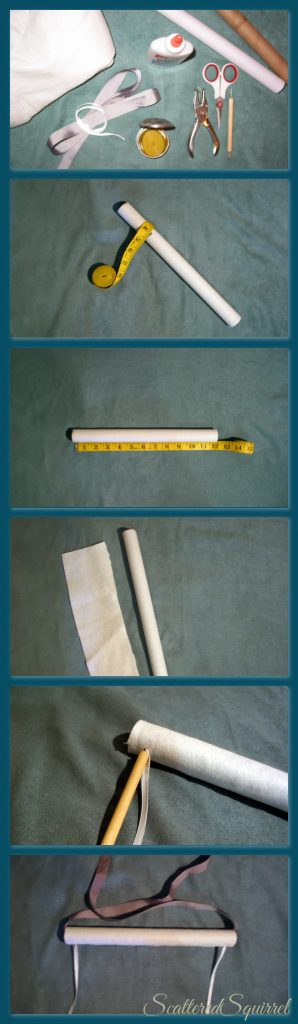
Supplies Needed
- Cardboard Tubes (I used ones from our plastic wrap and aluminum foil because they were sturdier and had a smaller circumference than paper towel rolls)
- Measuring Tape
- Fabric (I chose felt because I wasn’t sure if the chains would slide around on smoother fabric, but I really think any fabric would work)
- Ribbon, one piece for hanging and some for attaching the tubes together.
- Scissors
- Glue
- Hole Punch
- Pointy Object (to help push ribbon through holes)
Instructions
- Gather your supplies.
- Measure the tube’s circumference and length.
- Cut fabric to size. Repeat Steps 2 and 3 for the second tube.
- Glue fabric to tubes. Now I’m sure that some of you really talented and crafty people out there could probably sew a cover for the tubes, but I was feeling really lazy.
- While glue dries, decide how much space you want to leave between the two tubes. I laid out my shorter necklaces and measured the longest one, then added an inch.
- Measure the ribbon you’re using to join the two tubes together using the measurement from Step 5 and adding two inches. This gives you an inch on either end for tying the knots. Cut it to size. You’ll need two of the same length.
- Punch holes in the bottom of one tube and the top of the other. (The ‘bottom’ being the part that has the seam on it) You could also punch the holes so that the seams are facing the back. To keep it even I used my hole punch as my guide, pushing it onto the tube as far as it would go for each hole. You could also measure and mark where you want your holes.
- Taking the ribbon we cut in Step 6, thread it through one of the holes and tie a knot using the last inch or so of ribbon.
- Thread the other end through a hole on the other tube and tie a knot using the last inch or so of ribbon.
- Repeat Steps 8 and 9 for the remaining side. For this step I use my measuring tape to measure the finished side then used that to help make the second side even with the first.
- Finally take your other ribbon, thread it through the tube that doesn’t have its seam facing up. Pull the ends up a little way and tie in a bow. And that’s it.
I used a 3M Command Hook to attach it to the wall, and I was finished. I don’t have a ton of jewelry, but now I can easily see what I have and consequently what I would like to add to, like, oh say, my earring collection, of which I only (brace yourselves) have one pair.
The ribbon that the organizer hangs from works perfectly to hang earrings from. I really like how easy it is to see what’s there. Before this I was keeping everything in one of the drawer organizers designed for cutlery. While it kept everything contained it was rather difficult to keep chains from tangling, and it sat on the floor of our closet, which was far from an ideal place to store jewelry.
One of my favorite parts is that my longer necklaces can now hang and stay tangle free. And it really wouldn’t be hard to add another tube if my collection grows. Only time will tell if this works, but I love seeing it on the wall so that has to count for something right? It makes me smile every time I walk into our closet.
I’m pretty sure it will take longer to read this post than it did to put this little organizer together. There are few things I would do differently, or possibly change down the road,. Firstly, I would use a pretty patterned fabric. It would be an easy way to add a splash of color and all things considered my reason for using the felt was to keep the chains from slipping around, and I think gravity does that just fine. I also think I would use spray adhesive as opposed to craft glue. The craft glue worked great, its holding up well, but it was kind of gloopy to get it onto to the tubes, and getting the fabric wrapped around the tube was a little finicky with sticky fingers. Other than that though, I’m thrilled with how it turned it out.
How do you store your jewelry? Are you finding some extra time this summer to tackle organizing projects? If so, what are they?